API tokens allow another application to identify itself and access certain data or functions of StarNapp without using a person's email and password.
A token works like a technical password. Creating it does not automatically connect any application: afterwards we will need to copy it into the program or integration that will communicate with StarNapp.
We will go to SETTINGS → CONFIGURATION → API TOKENS.
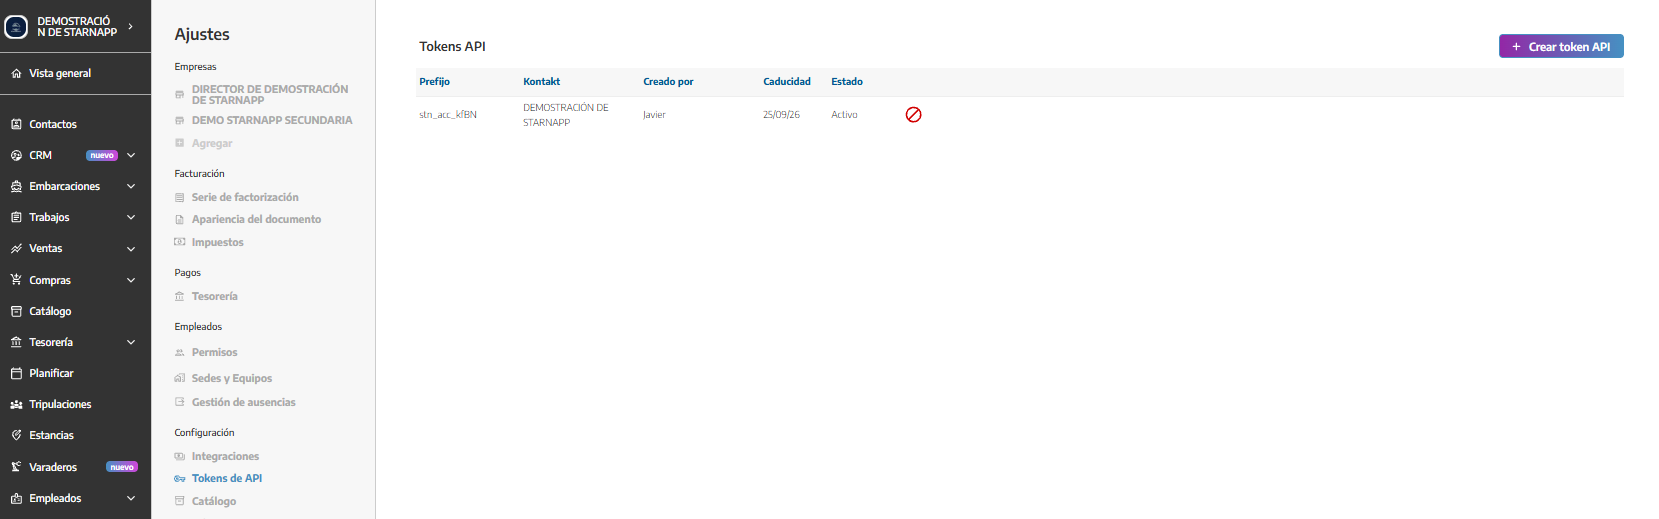
On this screen we will see the tokens created for the account and the following information:
Prefix: allows you to identify the token without displaying its full value.
Account: company or account to which it belongs.
Created by: user who generated it.
Expiration: date until which it can be used.
Status: indicates whether it is active or revoked.
🔒 Only users with permissions to access the settings can create API tokens for the account.
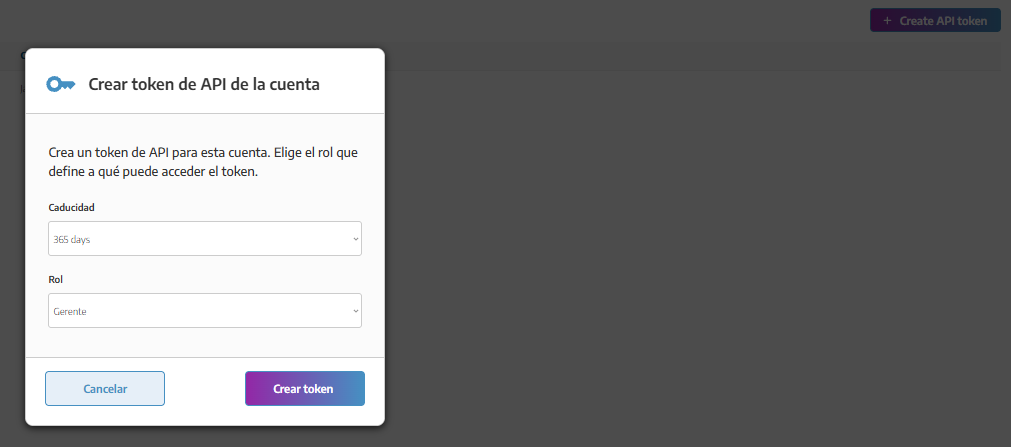
We will click Create API token.
We will choose an expiration date.
We will select the role that the token will use.
We will click Create token.
We will copy the token and save it in a secure location.
We will click Done to close the window.
⚠ The complete token is only shown once. When we close the window, we will not be able to view it again.
We can set a duration of:
7 days.
30 days.
90 days.
365 days.
No expiration.
We recommend using an expiration date whenever possible. The No expiration option should be reserved for permanent integrations that are reviewed periodically.
The role determines what information and functions of StarNapp the application using the token will be able to access.
For example:
If a tool only needs to query information to prepare reports, we will use a role with query permissions.
If an integration must create or update contacts, we will select a role with permissions on Contacts, but without unnecessary access to other areas.
We will avoid using an administrator role unless the integration really needs all those permissions.
💡 It is recommended to create a specific role for each integration and grant it only the permissions it needs. Consult Roles and permissions.
We will revoke a token when:
The integration is no longer in use.
We suspect that the token has been shared or exposed.
We want to replace it with a new one.
The person or company responsible for the integration stops working with us.
To do this, we will locate the token in the list, click the revoke option and confirm the action.
Once revoked:
Requests made with that token will stop working.
The token will appear with the status Revoked.
It cannot be reactivated.
If the integration needs to continue working, we will have to create another token and update it in the external application.
Treat the token as if it were a password.
Store it in a password or secrets manager.
Do not send it by email or share it in conversations.
Do not include it in documents, spreadsheets, or code repositories.
Use a different token for each integration.
Assign only the necessary permissions.
Immediately revoke any token that may have been exposed.
I cannot see the complete token again
For security reasons, StarNapp only displays it at the moment of creation. We will need to generate a new one and revoke the previous one if it is no longer going to be used.
The integration has stopped working
We will verify that the token has not expired or been revoked. We will also check that it has been completely copied to the external application.
The integration connects, but cannot perform an action
We will review the role assigned to the token. It is possible that it does not have permissions to access that section or perform that operation.
The option to create tokens does not appear
The user probably does not have the necessary permissions to access this configuration. An administrator should review their role.